
Hartland Care and Repair
The topic of repairs and care cames up fairly often on my old Westerns Bulletin Board. There were quite a few GREAT replies from a variety of collectors. Besides my comments on the subject, I have included some replies from other collectors here. Thanks for the help!
Please Read: Tips, techniques, and suggestions on this page and on this site are submitted with the best of intentions. They have worked for the submitters, but have not been thoroughly tested under all conditions. Use any of them at your own risk. Do your own tests prior to committing the processes on your expensive pieces. Also, some require gloves, respirators and safety equipment.
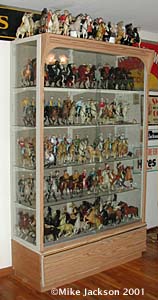
Display:
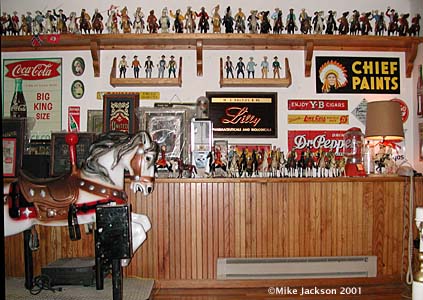
The case on the left came from a Hallmark Card store that sold out a few years ago. I was lucky enough to get two of the cases It has a pair of lights on the top and sliding glass doors. In this climate, we get a lot of dust, but I guess that is the price we pay for low summer humidity. The two drawers at the bottom of the shelf hold extra saddles and loose figures. The top shelf on the far wall holds about 35 sets and the two small shelves hold one set of 10 gunfighters. Luckily, this room doesn’t get direct sunlight. I am always a little scared that my kids might forget the rules and bounce a rubber ball near them. I’d prefer all the sets were in a glass protected display case.
Storage:
 Hartland originally shipped the statues in a cardboard box with each piece carefully wrapped in tissue paper. I’ve never heard of the tissue sticking to the paint, so that should still work. The biggest concern for the plastic pieces is heat. Humidity is probably not great for them either, but there’s usually not much we can do about that. Storing them in the hot attic is probably much worse on them than in the cellar, though you might be concerned about mildew in some areas of the country. I keep my extras individually packaged in 1 gallon plastic zip lock bags and combine them into the boxes I buy at an office supply store. I can get between 10 and 15 sets in one box. Just watch out for the heat!
Cleaning:
Some pieces only need a little water and a dry rag to remove the shelf dust. A soft brush or sponge will help get into crevices and folds. I spend an evening about once every month or two to remove the dust from my display sets.
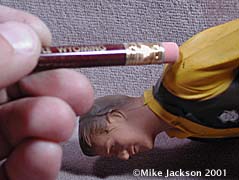 Pencil Eraser Method:
Most pieces you find will have what is commonly called “play marks”. Those are usually either black or silver paint that has rubbed off of another piece. Most of these come off nicely. I use one of two processes, sometimes both! Try getting the piece wet and using a new pencil eraser! Don’t rub too long! Most will come right off. The other method is to clean with Novus Plastic Polish as described below.Plastic Polish and Cleaner:
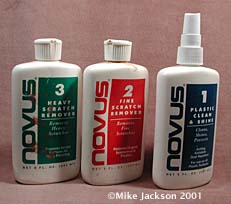 Novus Plastic Polish
Minneapolis, MN 800-548-6872
It is also often available at a snowmobile repair shop, motorcycle repair shop, or an aviation supply shop. It is used to polish scratches and abrasion out of most acrylic surfaces.
It comes in three grades:
Polish #3 is for heavy scratches and abrasions.
Polish #2 is for light scuffs and marks.
Polish #1 is used to polish the plastic to a glossy sheen.
Novus Plastic Polish sells for about $7-$9 per 8 ounce squirt bottle
I bought one of all three but would probably buy #2 if just buying one. Squirt out a little on your piece and rub the area carefully with a paper towel or Q-Tip. This is a fairly safe technique, but don’t rub too long in one place. Clean up with regular water.
If you have deeper scratches in the molded plastic, such as the white or buckskin colored plastic, you can rub a little harder and longer. In fact, you can start with #3 to get the light scratches out and work up the #1 to get the sheen back. (Thanks to Ken Milchick for the tip on the Novus Polish)
Warped Pieces: reforming saddles and legs
Heat is usually the cause of most pieces warping. You can use heat to help reform them, but you must be careful. The two most common methods are straight heat from a hair dryer or heat gun and hot water. Both work, but as in any of the processes mentioned, you need to test on old scrap pieces.
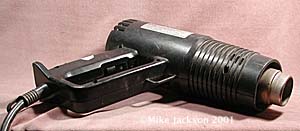 Hair Dryer or Heat Gun: I have a Wagner Heat gun which develops incredible heat. I turn it on and lay it on its side next to the edge of the counter and let the heat blow towards me. For saddles, the key is to generally heat the entire saddle a little before concentrating on the specific area, usually the biggest bow of the saddle. Be careful not to get too close or you can scorch the plastic or get it too hot and leave fingerprints in the plastic. Go slow! Once slightly soft, simply bend the two halves outward. There are several ways of letting the piece cool. I usually just put the saddle right over a horse so the sides don’t close back together. You can also drop the piece in a bowl of cool water to cool it quickly.
 Hot Water:I haven’t used this one as much but other people tell me it works great for them. Basically, you just heat a bowl of water until it almost boils and put your saddle, hat or figure into the water. Let it sit until the plastic gets soft enough to reshape. You might even heat up the water with the saddle still in the water. When it is the way you want, let it cool or drop it in some cool water. Ken Milchick talks more about this process below.
Split Seams:
In general try to shy away from pieces with major problems such as broken parts or split seams. If you want to repair them, read this from Ken Milchick from the Bulletin Board on October 09, 2001:
“When a figure has a couple of splits, and some rather severe, the hot water method of softening the plastic is generally my first step. You always have to be careful not to overheat the water because it could bubble the plastic or dull the paint. Boil enough water so that you can totally immerse the figure in it (I usually pour some into a large plastic mixing bowl). Add a bit of tap water to the bowl to cool it down a tad. Then place submerge the figure in the hot water for at least a minute and a half. Gently press the figure back together with your fingers and thumbs to close up the splits. Once the gap is closed up a good bit, you should be able to use rubber tipped hobby clamps to close them all the way. The plastic doesn’t have to be heated at this point. Right before you tighten the clamp all the way, use a hobby paint brush to apply full strength acetone to both sides of the split. This will liquefy the surface plastic just enough so that the seam will weld shut. Acetone will remove paint, so, I usually do this on models that I intend to touch up or repaint. If the split is in an area where the plastic is unpainted, the acetone/clamping method works much better. Remember, it’s a good idea not to clamp heated plastic. There’s generally enough give in a model to use a clamp on cold plastic. The clamps I use are micro bar clamps that can also act as a spreader. The name of the tool is “Quick-Grip” and it’s manufactured by American Tool. I have several of the 8 inch size. They make larger sizes as well. Most hardware and hobby stores carry them.
Sometimes you can’t close up a seam tight enough with heat or clamps, and sometimes you can’t attach a clamp to the model because of where the split is located. If there is enough of a separation left after you’ve pressed the seam together, and you can’t attach a clamp, there’s one more thing you can do. Fill the seam with scrap plastic. Cut shards of plastic from a junker model (make sure that they’re thick enough to friction fit in the gap) and seal them in the seam split with acetone. You can either apply the acetone to just the shard (if it’s a small split) or moisten the plastic at the split site as well. Once the plastic sets after about 5 minutes, you can cut off the excess shard with an Exacto knife. Again, as always, these techniques require some practice. There are plenty of junker models out there selling for next to nothing. Adding a bit of thickness to a seam split area does nothing to detract from the appearance of a model. If the plastic matches the original color or the split is painted over you really can’t tell the difference.
Also, if you really don’t care if the model looks as it did originally, there are some two part epoxy putty products that you can use to fill seams. Miliput is one that adheres to Hartland plastic rather well.
Finally, I’ve found that models with tight seams age better. Some seam splits get worse with age. One that isn’t sealed all the way can reopen in the future. A good repair extends the models life. Take care. Ken”
 Removing Glued On Hats:
Once in a while, you’ll run across a set where the hat or gun has been glued into place. It seems that more than half the time, the original collector used something like Elmer’s glue. Occasionally, they used model cement, and unfortunately I don’t have a good suggestion on removing them. Model cement, through a chemical reaction, melts the two pieces together. Elmer’s school glue, on the other hand, only grips the two surfaces and hardens. In many cases, you can soak the whole piece in warm water for a few hours and let the water soften the old glue. I’ve had great success with this process. Even after getting the two parts separated, you can soak them longer and get most, if not all, the rest of the glue to dissolve or soften enough to remove it safely.
On a couple of occasions when the hat will not come off using the warm water, I have sacrificed a very common figure to get the hat. For example, I found a beat up Wyatt Earp glued to a Cheyenne hat. Using a band saw, I sawed the head just under the hat and saved the scrap Earp for salvaging paint and plastic (see Grave Robber Technique below). Then, using a Dremmel tool, I was able to grind away the top of the head. In most cases, the hat is held tight in only a couple of places.
 Removing Tape Residue:
Occasionally, you will find a set where the original owner used some sort of masking tape, double sided tape, or similar product to hold a saddle or figure to the horse. This usually leaves a tell tale rough glue residue spot. Try a product called Doggone, sold in small bottles at most hardware and paint stores. It is a citrus product which slowly loosens the old residue. After an hour or two of soaking, keeping it moist the entire time, the sludge can be wiped off and the piece can be cleaned as normal. This quart sized bottle was only $6.95. We’ve used this product for years to remove vinyl lettering and tape residue from signs that have been out in the weather a long time.
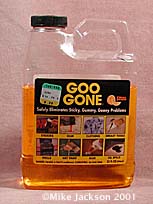
The package on the left is the same product as Goo Gone, but sold by another company. It costs roughly $4. I’m sure there are other similar products on the market that do basically the same thing. Goo Gone is readily available. You probably won’t need the large bottle and can save a few dollars.
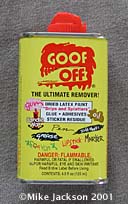
Removing Latex Paint Spatters
Goof Off works fairly well for removing old latex paint spatters. I’ve had several Hartland pieces spattered with small white dots of house paint by a careless house painter. This hasn’t harmed any of the paint finishes on any of may Hartlands I have ever used it on. You can buy it at most hardware stores and paint stores for around $4 for a small squirt can. It is also good for removing some glues, bubble gum, lipstick, candle wax, grease, oil, and markers.
Bleaching: *dangerous*
This process needs some disclaimers. It can be very dangerous and you should attempt it only with protective eye wear, gloves, and an apron. The fumes are toxic and caustic so do it outside! It can change paint colors! Do tests before bleaching your Rebel!
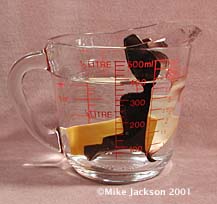
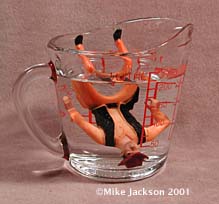
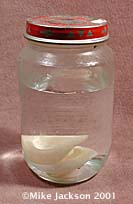 Solution Bleaching: The basic technique is to immerse a piece in a solution of 50% Clorox bleach and white vinegar for a period of time. That period depends on the freshness of the chemicals and how much yellowing you need to remove. For some hats, it can take only 10 or 15 minutes! The solution will turn many of the colors to an off color and will turn a Palomino horse pea green almost immediately. Because of that, I usually will only bleach pieces that are white plastic with possibly some black, brown, or dark blue paint. Reds, yellows, flesh tones, and ochres will shift colors. Once removed from the bleaching solution, it is best to run cold water over the piece to let the softened detail paints on the bridles and martingales harden. Since the inside of the piece was filled with the solution, it is best to fill a tub with regular water to try to dilute the remaining solution. To neutralize the solution, mix up another batch of chemicals with baking soda and water and soak the piece in it for at least an equal amount of time. Rinse and let dry. The photo to the left is a baby food jar with the solution and a couple hats bleaching in the bottom.
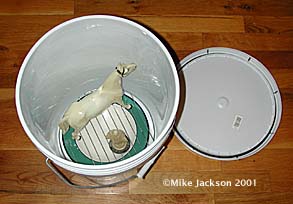
A safer method was described by Laurie Stetzler on the Bulletin Board in August of 2001. Instead of immersing the piece in the solution, she soaked a sponge in it and put it in a large zip lock bag, along with the piece. (make sure the plastic doesn’t set up against the sponge). The fumes from the solution will bleach the plastic! I recently tried this using a 5 gallon plastic bucket with a lid. Put a shallow bowl of the solution in the bottom of the bucket, and place the horse or plastic piece on a wire shelf above the bowl. When finished, it is probably still best to soak the piece in a baking soda solution. (this photo was taken inside for this page, but it is best to do this process outside!)
Sun Bleaching:
Several people suggested letting the sun bleach out the yellowing caused by smoke and years on a shelf. (I didn’t see the person’s name on a quick scan of the BB, but will add it here when I find it). The general idea is to set the piece in the sun for several days, rotating it and letting the sun hit it on all sides equally. The problem is to make sure you don’t let the piece get hot. It was suggested to put the piece in the grass to keep it cool, and not on a gas grill! I have to think you could put the plastic piece on a sheet of aluminum foil in the sun so the rays will bounce all around and cover the piece better. From all I can tell, this process does work, but it takes several days or longer. Laurie Stetzler suggests using 30 rated sun screen on areas you want to protect from the sun.
Beware:
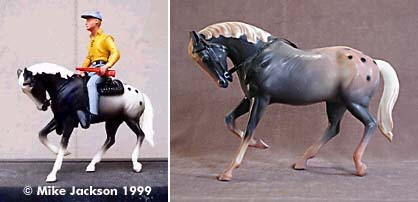 I’ve done some successful bleaching in the past, but I have also had some problems as shown here. This horse started as a palomino, but it had faded past use. I bleached it for quite a while, immersing the piece completely in the solution…maybe too long! This piece was done before Ken Milchick suggested using the Baking Soda solution to neutralize the bleach, so I can say that “might have been” the problem? After a few months, I started seeing some brown showing on the side facing the light. After a year or so, the white areas really took a beating and it even cracked fine lines in the plastic. As stated above, do your tests on junker pieces and get really comfortable with the techniques before trying anything new on a valuable piece.
Touch Up Paint:
Midwest Products Co., Inc. 800-348-3497
400. S. Insiana St. Box 564 Hobart, IN 46342
According to Ken Milchick, Aero Gloss paint works well for touching up Hartland figures. Ask for a paint chart and price list. The Aero Gloss paint looks like it might be quite toxic and should be used at your own risk. It is also fairly expensive at about $4.50 for 3.5 oz., using an August, 1998 price list.
Flesh Tones:
I never counted them, but it seems there are about 10 different colors of flesh tones on the Hartland Westerns. I’m sure the company that sold the paint to them had a specific formula for each. I don’t think Aero Gloss has a specific skin color that you can buy. Almost all the Hartland figures seem to have slightly different skin colors. I have about 6 or seven different colors mixed up and then do final adjusting when necessary. To get a fairly good start, try mixing a little orange into some white till you get a good tone, then add in a bit of medium brown. You will get a color that you can adjust in either direction for the more suntanned figures or a more fleshy orange hue. Try mixing up a small batch to get a feel of the proportions, as you can easily end up with a big bottle of a color that is way off and run out of your base colors.
Grave Robber Flesh Tones:
I keep a few really broken up figures around just to rob their flesh tones! On some figures, there is only a very minor nose rub which needs minor touch up. You can use a very small artists brush for this process. Dip it in a small bottle of acetone to get it moist, then work it around on the neck of a donor figure. The acetone will dissolve the flesh tone just enough to load the tip of the brush with 50 year old paint. Then just touch the tip of the nose with the brush. You can probably do several pieces at the same time, if they are close to the same color.
Additional Touch-Up notes from Ken Milchick from May 25, 2000 on the BB:
The art of touch-up can be tricky. The key is the type of paint and whether or not the toucher-upper is able to use an hobby air-brush. The main reason that I use Aero-gloss paint is that the base is similar to the kind of paint that Hartland used. For flesh I mix orange, flat white, a bit of red, maybe some yellow, and sometimes a bit of flat light earth. Mid-west doesn’t make dark browns, so you have to mix those yourself with orange, dark blue and red. The biggest drawback to touch-up is start-up costs. If you move too fast or add too much of one color or another to a mixture you can waste a lot of paint. I talked with a scenic designer about what colors to mix and purchased some paint mixing charts from an art supply store. This was very helpful.
One collector I spoke with over the phone tells me that he uses Testor’s enamel for flesh touch-up. He uses an air bush and thins the paint quite bit. I’ve seen some very nice work that collectors have done with both enamels and acrylics. The only way that I could tell that some of these were touched-up was the way the painted area felt to the touch. Aero-gloss or similar acetate paints leave that Hartland finish.
While you can brush paint with Aero-gloss, I don’t recommend it for touching-up faces. You end up with a figure that looks like he had a bad make-up job. Hands can be painted with thinned Aero-gloss if you’re willing to be patient. If you paint without re-stroking (quickly painting over the area you just painted) and allow a minute or two to elapse between coats, about six coats should cover the hands. They will eventually dry and cure and look factory painted. The good thing about most paints including Aero-gloss is that they can be removed with relative safety if you should mess up.
You can brush paint very successfully with thinned silver (aluminum), and gloss jet black. I do all of my silver trim, boots, and gun belts this way.
Any hobbyist should know that several thin coats of paint yield a far better finish than one cover-all thick coat. It takes a lot of practice. I thought I’d never be able to approximate that “factory” look. It’s taken me quite some time, but I’m sure anybody can do this if they have patience. Ken
Molding Putty:
According to Ken Milchick, he prefers either of two products. Premier Epoxy Putty or Miliput
Premier Epoxy Putty: Premier is easier to use because it’s pre-measured. It works the same as Miliput and it’s cheaper because it’s manufactured here. Premier is sold by Barnett INC. Jacksonville, FL 32254. It is manufactured for Barnett INC. by: William H. Harvey Company, Omaha, NE 68117. A two ounce four inch tube of Premier Epoxy Putty costs about $3.50.
Miliput is made in Wales of theU.K.. Miliput costs about $11 per four ounce box. The only possible advantage in using Miliput is that it comes in white as well as gray. Premier only comes in gray. Miliput targets hobby shops while Premier is usually found in Hardware stores.
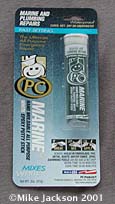 PC Marine Epoxy Putty:
I picked this package up at my local Tru-Value store for around $4.50. It is a white version of the same material Ken described above. You simply break off a piece off the stick of putty. It consists of two parts that you mix together with your fingers to activate the chemical reaction. Then mold to the approximate shape and stick it to the piece. Once dry, roughly an hour, you can grind, sand, carve and sculpt it to final shape.
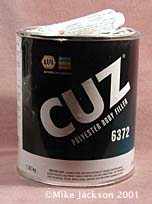 Automotive Body Putty:
I’ve used body putty on a few figures with success. It is a little bit more liquid. It might be perfect for some projects. The epoxy putties are usually much more stiff and will probably fit more of your needs. It was probably worth including on this page. You can buy a quart of it and the hardener tube at an automotive supply store for around $15. Acetate Goop: (no photo)
Several customizers use flakes or scrapings of original acetate plastic dissolved into acetone to make a slimy putty.
Please Read: Tips, techniques, and suggestions on this page and on this site are submitted with the best of intentions. They have worked for the submitters, but have not been thoroughly tested under all conditions. Use any of them at your own risk. Do your own tests prior to committing the processes on your expensive pieces. Also, some require gloves, respirators and safety equipment. Use these processes and suggestions at your own risk!
In July of 2022, Darla and I made the tough decision to sell out in Jackson Hole and move to a new home in Colorado. With limited space, I sent my entire collection of Hartland sets and boxes to an auction company. I still have a nice group of original parts, and some religious sets and pieces but I don’t have any boxes available now.
When I sold many of the sets, I pulled off many of the original parts to sell in the future. I have a lot of saddles, hats and weapons…just need to dedicate the time to photograph and list the pieces I have.
While I probably “should” close this site, I have left some of the old Hartland History pages, such as the Champ and Mastercrafters Clocks pages available. The pages corrected information found in some of the available books.
MJ
Mike Jackson 3588 Gold Hill Dr. – Loveland, CO 80538
E-MAIL
All Images and text on this site copyright Mike R. Jackson 1998-2024